Jest单元测试中常用的方法和技巧
本文首次发布于掘金,转载请注明来源。
一、mock模块
在Jest中,对模块进行mock非常简单,只需要使用jest.mock即可,对于模块的mock主要有两种情况:
只mock模块中的非
default导出对于只有非
default导出的情况(如export const、export class等),只需要使用jest.mock,返回一个对象即可,对象中包含有你想要mock的函数或者变量:1
2
3
4// mock 'moduleName' 中的 foo 函数
jest.mock('../moduleName', () => ({
foo: jest.fn().mockReturnValue('mockValue'),
}));mock模块中的
default导出对于
default导出的mock,则不能返回一个简单的对象,而是需要在对象中包含一个default属性,同时添加__esModule: true。When using the factory parameter for an ES6 module with a default export, the __esModule: true property needs to be specified. This property is normally generated by Babel / TypeScript, but here it needs to be set manually. When importing a default export, it’s an instruction to import the property named default from the export object
1
2
3
4
5
6
7
8
9
10
11
12import moduleName, { foo } from '../moduleName';
jest.mock('../moduleName', () => {
return {
__esModule: true,
default: jest.fn(() => 42),
foo: jest.fn(() => 43),
};
});
moduleName(); // Will return 42
foo(); // Will return 43
二、mock模块部分内容
如果只想mock模块中的部分内容,对于其他部分保持原样,可以使用jest.requireActual来引入真实的模块:
1 | import { getRandom } from '../myModule'; |
三、mock模块内部函数
设想一种情况,有一个utils.ts文件,内部导出了两个函数funcA和funcB,然后在funcB中引用了funcA:
1 | // utils.ts |
这个时候在对funcB进行单元测试时,如果想要对funcA进行mock,会发现mock失败:
1 | import { funcA, funcB } from '../src/utils'; |
运行单测会得到一个报错
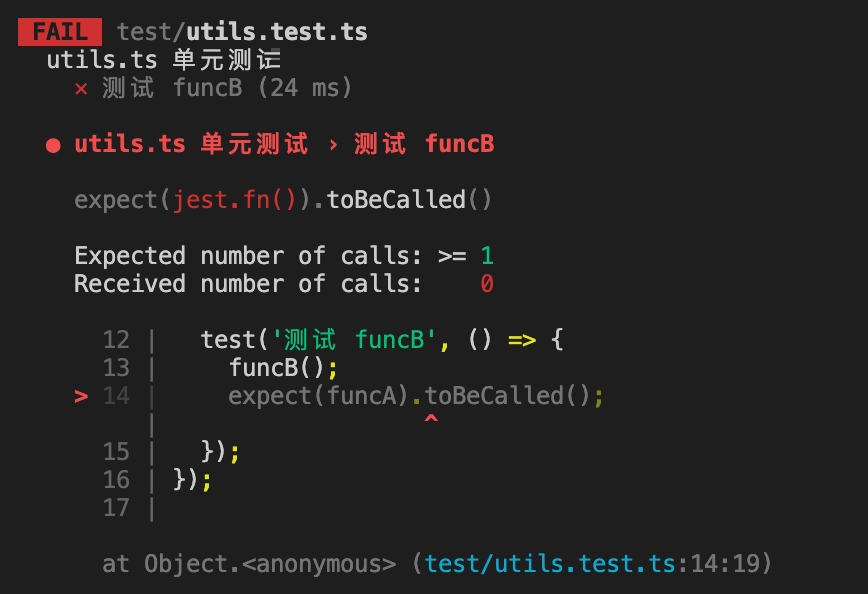
很明显,我们对funcA的mock失败了,为什么会有这样的结果呢,因为我们从模块外部导入的funcA引用和模块内部直接使用的funcA引用并不是同一个,通过jest.mock修改funcA并不会影响内部的调用。对于这种情况,建议的解决方法有两种:
- 拆分文件,将
funcA拆分到不同的文件。这种做法可能会造成文件过多且分散的问题。 - 将相互调用的函数,作为一个工具类的方法来实现。即将互相调用的函数,放到同一个工具类中。
四、mock类(class)构造函数中对其他成员函数的调用
当我们在mock一个class的方法的时候,很简单地将类对象的对应方法赋值为jest.fn()即可,但是对于在构造函数中调用的成员方法,却不能这样做。因为类里面的方法只能在实例化完成之后再进行mock,不能阻止constructor中执行原函数。
这时,我们可以考虑一下,class的本质是什么,class是ES6中的语法糖,本质上还是ES5中的原型prototype,所以类的成员方法本质上也是挂载到类原型上的方法,所以我们只需要mock类构造函数的原型上的方法即可:
1 | class Person { |
1 | Person.prototype.init = jest.fn(); |
五、mock类中的私有函数(针对TypeScript而言)
对于ts中类的私有函数(private),无法直接获取(虽然说可以ts-ignore忽略ts报错,不过不建议这样做),这时只需使用同样的方法,在类的原型上直接mock即可:
1 | class Person { |
1 | Person.prototype.funcA = jest.fn(); |
六、mock对象的只读属性(getter)
在单测中,对于可读可写属性我们可以比较方便地进行mock,直接赋值为对应的mocK值即可,如Platform.OS。但是对于只读属性(getter)的mock却不能直接这样写。通常对于只读属性(此处以document.body.clientWidth为例)有以下两种mock方式:
通过
Object.defineProperty1
2
3
4Object.defineProperty(document.body, 'clientWidth', {
value: 10,
set: jest.fn(),
});通过
jest.spyOn1
2const mockClientWidth = jest.spyOn(document.body, 'clientWidth', 'get');
mockClientWidth.mockReturnValue(10);
七、使用toBeCalledWith对参数中的匿名函数进行断言
我们需要对于某个方法测试时,有时需要断言这个方法以具体参数被调用,toBeCalledWith可以实现这个功能,但是设想下面一种情况
1 | export const func = (): void => { |
在某种情况下,moduleA.method1将会被传入参数1和一个匿名函数,要怎么用toBeCalledWith断言moduleA.method1被以这些参数调用了呢?因为第二个参数是一个匿名函数,外部没办法mock。这个时候,我们可以使用expect.any(Function)来断言:
1 | moduleA.method1 = jest.fn(); |
因为这里其实只关心moduleA.method1是否被传入第二个参数且参数是否为一个函数,而不关心函数的具体内容,所以可以用expect.any(Function)来断言。
八、mock localStorage
localStorage是浏览器环境下的一个全局变量,挂载在window下,在单测运行时(Node环境)是获取不到的,对于localStorage,我们可以实现一个简单的mock:
1 | class LocalStorageMock { |
建议把mock放到单独的mocks文件中,在需要测试的地方,单独引入即可:
1 | import './__mocks__/localStorage'; |
九、mock indexedDB
对于indexedDB,情况和localStorage类似,它是浏览器环境下的一个事务型数据库系统,同样在Node环境中无法获取,但是由于indexedDB接口、类型较多,实现起来较为复杂,不建议自己实现,比较常见的做法是使用fake-indexeddb这个库,这个库使用纯js在内存中实现了indexedDB的各种接口,主要用于在Node环境中对依赖indexedDB的代码进行测试。
对于需要测试的文件,只需要在文件开头引入fake-indexeddb/auto即可:
1 | import 'fake-indexeddb/auto'; |
如果需要对所有的文件都引入fake-indexeddb,那么只需要在jest配置中添加如下配置:
1 | // jest.config.js |
或在package.json中
1 | "jest": { |
十、测试异步函数
在单测中,如果需要对异步函数进行测试,针对不同情况有如下操作:
callback回调函数异步对于回调函数异步(如
setTimeout回调),如果像同步函数一样进行测试,是没办法获取正确的断言结果的:1
2
3
4
5export const funcA = (callback: (data: number) => void): void => {
setTimeout(() => {
callback(1);
}, 1000);
};1
2
3test('funcA', () => {
funcA((data) => expect(data).toEqual(2));
});像上面那样,
funcA会在回调里传入1,单测里就算是直接断言结果为2,也是可以直接通过单测的: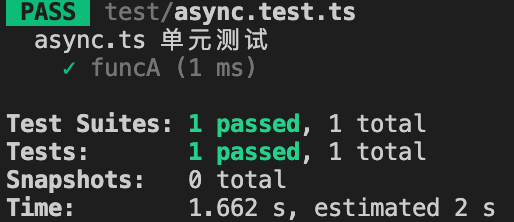
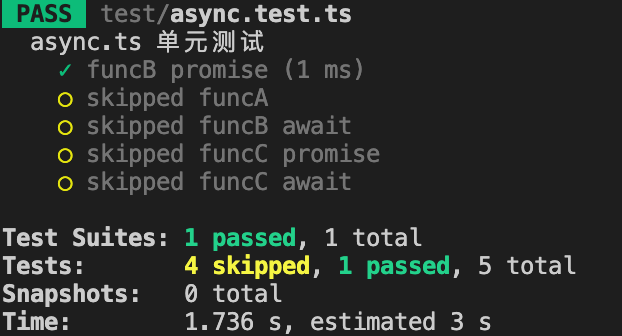
这是因为jest在运行完
funcA后就直接结束了,不会等待setTimeout的回调,自然也就没有执行expect断言。正确的做法是,传入一个done参数:1
2
3
4
5
6test('funcA', (done) => {
funcA((data) => {
expect(data).toEqual(2);
done();
});
});在回调执行完之后显式地告诉jest异步函数执行完毕,jest会等到执行了
done()之后再结束,这样就能得到预期的结果了。Promise异步除了回调函数外,另外一种很常见的异步场景就是
Promise了,对于Promise异步,不用像上面那么复杂,只需要在test用例结束时,把Promise返回即可:1
2
3
4
5
6
7export const funcB = (): Promise<number> => {
return new Promise<number>((resolve) => {
setTimeout(() => {
resolve(1);
}, 1000);
});
};1
2
3test('funcB', () => {
return funcB().then((data) => expect(data).toEqual(1));
});如果使用了
async/await语法,就更简洁了,Promise都不需要返回,像测试同步代码一样直接书写即可:1
2
3
4test('funcB', async () => {
const data = await funcB();
expect(data).toEqual(1);
});对于
Promise抛出的异常,测试方法也和上面类似:1
2
3
4
5
6
7
8// 抛出异常的方法
export const funcC = (): Promise<number> => {
return new Promise<number>((resolve, reject) => {
setTimeout(() => {
reject('something wrong');
}, 1000);
});
};1
2
3
4
5
6
7
8
9
10
11test('funcC promise', () => {
return funcC().catch((error) => expect(error).toEqual('something wrong'));
});
// or
test('funcC await', async () => {
try {
await funcC();
} catch (error) {
expect(error).toEqual('something wrong');
}
});
十一、不执行jest.spyOn mock的函数
我们知道,jest.fn和jest.spyOn都可以用来mock一个函数,区别是jest.fn mock的函数不会去执行,而jest.spyOn mock的函数是会去正常执行的。那么有没有什么办法让jest.spyOn mock的函数不执行呢?其实上面已经用到了,在“mock对象的只读属性(getter)”中,通过jest.spyOn mock了一个getter,然后使用mockReturnValue来mock一个返回值,这个时候原函数就不会执行。
除此之外,使用mockImplementation也有同样的效果:
1 | mockFn.mockImplementation(() => {}); |
总结下来就是可以使用mockReturnValue和mockImplementation不执行jest.spyOnmock的函数。
另外多说一个建议就是,能使用jest.fn就尽量不要用jest.spyOn,因为jest.spyOn会执行原始代码,在统计单测覆盖率时会被统计进去,导致单测覆盖率看起来很高实际上却又很多代码没有相应单测。
十二、使用test.each
有时我们会遇到这种情况,要写大量单测用例,但是每个用例结构一样或相似,只有细微不同,比如测试某个format函数对于不同的字符串的返回结果,或者调用一个类不同的成员方法但返回的结果类似(如都抛出错误或return null等),对于这些情况,有时我们可以在单测内写一个数组然后遍历执行一下,但其实jest已经提供了应对这种情况的方法,即test.each,举几个例子:
1 | // each.ts |
又比如在某种情况下,某个对象store的所有方法都会抛出异常:
1 | test.each<{ |
除了test.each外,还有describe.each,更多具体用法可以参考test.each和describe.each
十三、使用.test.js、.test.ts、.test.tsx
这点是一个建议,建议单测文件以.test.js、.test.ts、.test.tsx命名,如对于utils.ts,建议对应的单测以utils.test.ts命名,这样每个单测文件单单从文件名来说就具有清晰的语义,即这是一个单测文件,而不是一个具有具体功能的源码文件。
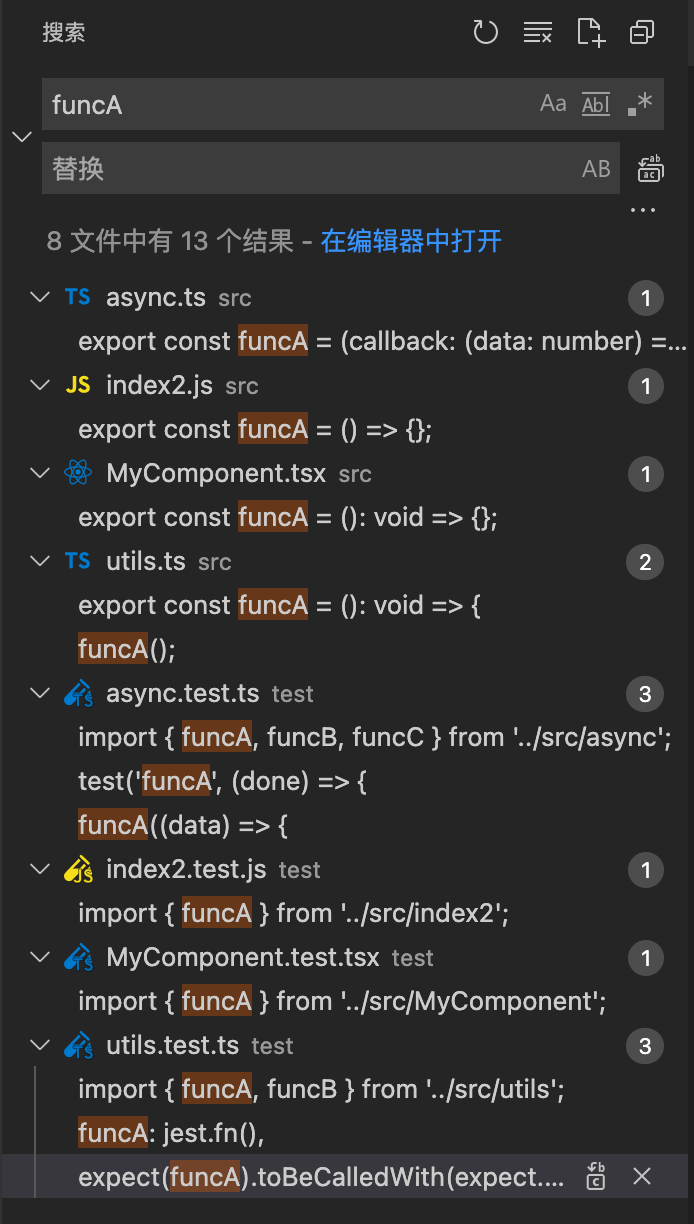
同时,在搜索文件或者全局搜索字符串时,列表里的文件更清晰可见容易辨认。更进一步来说,现在很多IDE的文件图片icon插件,针对不同的文件名结尾,都有不同的渲染,更加方便辨认:
十四、配合使用Jest Runner插件
另外推荐一个VSCode插件,Jest Runner,这个插件会在.test.js、.test.ts、.test.tsx中,渲染几个按钮选项:
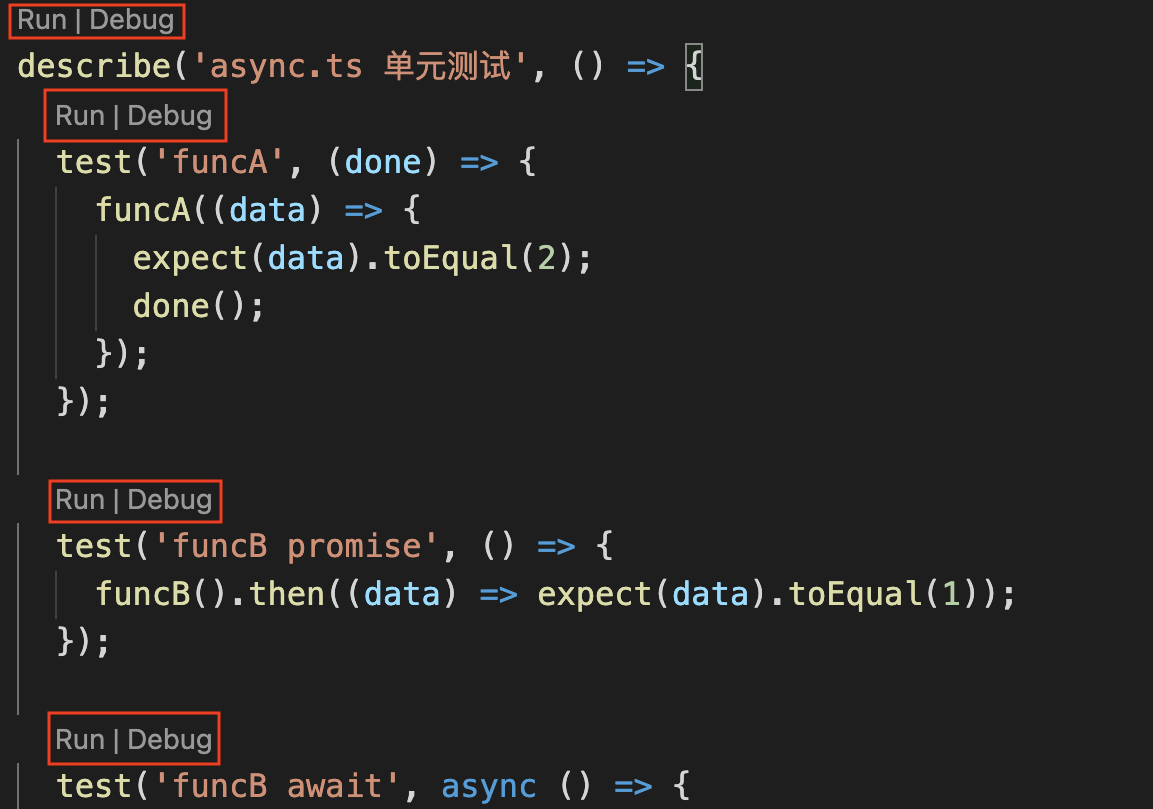
点击Run或Debug,可以只运行或调试某一个test或者describe,不需要重新全局npm run test也不用单独jest执行这个文件,极大提高写单测的效率:
这个插件只针对.test.js、.test.ts、.test.tsx这几个文件类型有效,所以这也是上面建议单测文件使用使用.test.js、.test.ts、.test.tsx命名的原因之一。
同时,插件提供的Debug,也省去了繁琐的launch.json配置,可以方便地进行断点调试。
十五、其他技巧
1. jest配合enzyme对React.forwardRef组件进行测试
对于React.forwardRef组件,假设有如下用例
1 | test('render', () => { |
对于普通的组件,“ComponentName”只需要填入对应组件的名字即可,如”Text”
1
expect(wrapper.find('Text').exists()).toBeTruthy();
但是对于使用了React.forwardRef来进行ref转发的组件,“ComponentName”则需要加上“ForwardRef”,如“ForwardRef(MyComponent)”
1
expect(wrapper.find('ForwardRef(MyComponent)').exists()).toBeTruthy();
2. 收集单元测试覆盖率
有以下几种方式收集单元测试覆盖率:
命令行执行全部单测并收集覆盖率
1
npx jest --coverage
命令行执行单个单测文件并收集覆盖率
1
npx jest src/utils/__tests__/utils.test.ts --coverage
在
jest.config.js中配置collectCoverage,同时设置collectCoverageFrom来收集指定文件的覆盖率1
2
3
4
5
6
7
8module.exports = {
// ...
collectCoverage: true,
collectCoverageFrom: [
'src/**/*.{js,jsx,ts,tsx}',
'!src/**/*.d.ts',
],
};这样在命令行执行
npx jest时,就会自动收集覆盖率了。